PEG tube basics: types and placement
In order to get adequate fluids, nutrients, and medications, a feeding tube may be needed. Most “tubies” have some degree of dysphagia (difficulty swallowing), and may receive one or more types:
NG (nasogastric) - a thin tube placed in the nostril down to the stomach
NJ (nasojejunal) - much like the NG, but goes down to the jejunum (second section of the small intestine)
TPN (total parenteral nutrition) - IV administered nutrition
PEG (percutaneous endoscopic gastrostomy) - a tube placed in the stomach through an incision through the skin
PEG-J (percutaneous endoscopic gastrojejunostomy) - similar to the PEG, but the tube goes down to the jejunum through the incision and stomach
Tubes may be temporary or permanent and some types have low profile options that are easier to hide under clothes. These are called “buttons” or “Mic key buttons”.
For this article, I'll be focusing on the PEG type, which I have had since 2016.
Placement
Initial
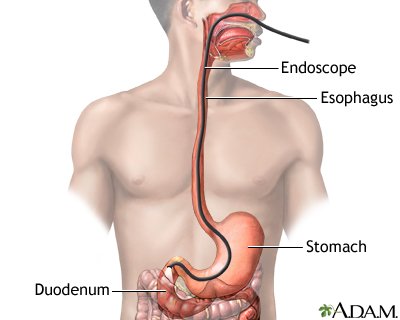
The first tube is placed during an endoscopy of the upper digestive tract (EGD/esophagogastroduodenoscopy). Typically, mild sedation that makes you fall asleep and not remember anything will be used, but other forms of sedation may be used. A thin, flexible tube with a light and camera is put down the throat and into the stomach.
The doctor shines the light brightly to aide in finding the place for the incision and makes one in the abdomen to reach the stomach. A PEG tube is threaded into the incision. This tube will have an internal bumper and no balloon. An abdominal binder will need to be worn for 24 hours to ensure proper healing.
Replacement
Replacing a tube with a well established stoma is much easier than expected! If the initial tube is being removed, the doctor will gently pull on the tube until the internal bumper slips off and the tube comes out (the internal bumper is easily passed).
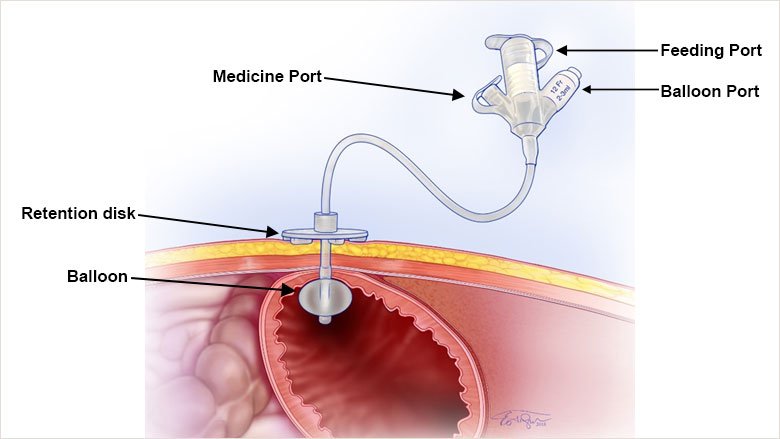
If a balloon tube is being removed, the balloon is drained using a syringe in the “balloon” port. The tube is then removed and the new one is placed into the stomach. Ensure that the balloon is well into the stomach before filling the balloon with sterile water or sterile saline using a sterile syringe.
When the balloon is full, tighten the tube's external bumper until the flat part is against the skin. Try to keep the external bumper up against the skin - but be careful not to squeeze it tight! You should be able to slide a gauze pad between the bumper and the skin! Doing so helps to prevent leakage of stomach contents and friction blisters.
For buttons, there is no external bumper!


